In this article, we are going to learn ‘System Requirement and Installation Windows Server 2019’. Some new features in Windows Server 2019. Windows Server 2019 is built on the strong foundation of Windows Server 2016 and brings many innovations on four key themes: Hybrid Cloud, Security, Application Platform, and Hyper-changed Infrastructure (HCI)). In the previous article, you first saw the Installation of Windows Server 2016 and 2012.
System requirements for Windows Server 2019:-
- Processor – 1.4 GHz 64-bit processor
- RAM – 512 MB
- Disk Space – 32 GB
- Network – Gigabit (10/100/1000baseT) Ethernet adapter
- Optical Storage – DVD drive (if installing the OS from DVD media)
- Video – Super VGA (1024 x 768) or higher-resolution (optional)
- Input Devices – Keyboard and mouse (optional)
- Internet – Broadband access (optional)
Follow the below steps for Installation Windows Server 2019:
First, download the following link and download the Windows Server 2019 ISO.
https://www.microsoft.com/en-us/evalcenter/evaluate-windows-server-2019
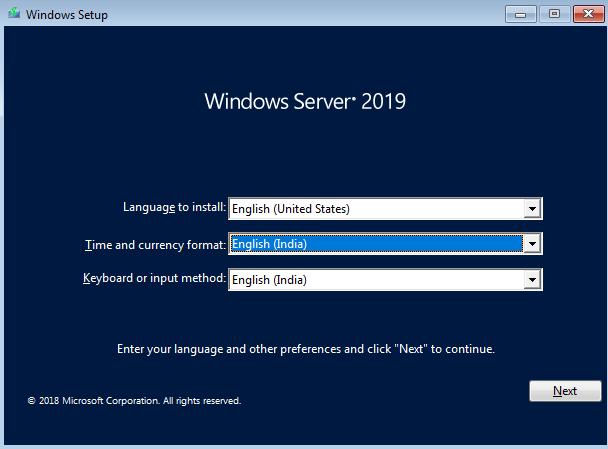
After you finish downloading the ISO file, then make a bootable cd/DVD or pen drive. configure your BIOS TO boot from CD OR DVD and press “ENTER to boot from CD/DVD OR Removable device. After a few minutes, you receive the Windows Server 2019 screen shown “Windows. Now let’s click Next and start the process of installing Windows Server 2019. Here, select the language, time, and keyboard settings for your system.

Just click on Install Now:
Start the Windows Server 2019 installation process by clicking on ‘Install Now‘ here.

Select Operating System:

Accept Agreement License:
Read license agreement turn on checkbox” I accept the license terms” and then click Next.

Click On Custom Install:
you’ll need to select the Custom installation option. Go through the installation process normally until you reach the type of installation do you want? screen and click the Custom option.

Create Partitions:
On the next screen, click the Drive options (advanced) link. Create several partitions by clicking the New button and entering a size for each partition.

Installing Windows:
It will start copying the windows server file. this take will a while could be 20 mins it will reboot automatically.

Also Read – Installing and Configuring Active directory in windows server 2016.
Password Setting:
In the Password, the box enters a new password for this computer and then clicks finish.

As you can see above we have successfully installed the Windows Server 2019.

Also Read – How To Configure DHCP Server Role on Windows Server 2016
That’s all, In this article, we have explained System Requirement and Installation Windows Server 2019. I hope you enjoy this article. If you like this article, then just share it. If you have any questions about this article, please comment.
