The wonderful Ubuntu terminal is freely available for Windows 10 using this tool you are going to install Ubuntu on Windows 10. As any Linux user knows, it’s the command line terminal where the magic happens. It’s perfect for file management, development, remote administration and a thousand other tasks.
The Ubuntu terminal for Windows has many of the same features you’ll find using the terminal on Ubuntu:
Requirements to install Ubuntu on Windows 10
You will need an x86 PC running Windows 10. More importantly, the Ubuntu terminal for Windows 10 is currently only available as part of Microsoft’s free Windows Insider Program. This lets you test pre-release software and upcoming versions of Windows while potentially allowing Microsoft to collect usage information.
If stability and privacy are essential for your installation, consider waiting for the Windows 10 Fall Creator update, due October 2017. With this release, installing the Ubuntu terminal won’t require Windows Insider membership.
Also Read- Step By Step Installation Of Ubuntu 17.04.
Join the Windows Insider program
If you’re already a member of the Windows Insider Program, skip to the next step. If not, open the following link in your favorite web browser:
https://insider.windows.com/en-us/getting-started/
To enroll, sign in using the same Microsoft personal account you use for Windows 10 and follow the Register your personal account
You now need to open Windows 10 Settings from the Start menu, select ‘Updates & Security’ followed by ‘Windows Insider Program’ from the menu on the left. If necessary, click on the ‘Fix me’ button if Windows complains that ‘Your Windows Insider Program account needs attention’.
Windows Insider content
From the Windows Insider Program pane, select ‘Get Started’ . If your Microsoft account isn’t linked to your Windows 10 installation, sign in when prompted and select the account you want to link to your installation.
You will now be able to select what kind of content you’d like to receive from the Windows Insider Program. The least disruptive is the default option, Just fixes, apps, and drivers Confirm
Also Read – Microsoft Windows 10 Tricks,Tips and Features
Activate the Windows Subsystem for Linux
While Ubuntu does appear when searched for within the Windows Store, it currently needs to be installed and activated separately, starting with the Windows Subsystem for Linux:
Search the Start menu for ‘Windows features’ and select the resultant control panel Scroll through the Windows Features Windows Subsystem for Linux (Beta) Press OK to activate the changed configuration When prompted, restart your machine. Enable Developer Mode
After your PC has restarted, one final step is required before we can install Ubuntu for Windows, and that’s enabling Developer Mode. Enabling this allows you to install and run apps from outside the Windows Store:
Open the Settings Select Update & security For developers from the left-hand menu Enable the Developer mode Also Read – How to Generate SSH Keys on Windows 10 with Ubuntu.
Install Ubuntu on Windows 10 Open the Windows Command Prompt . The easiest way to do this is to type cmd into the Start menu and run the default result.
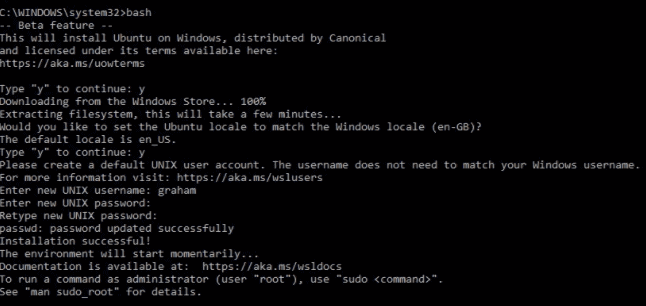
When the command prompt appears, type bash . The output from this command will announce that Ubuntu for Windows is about to be installed. Type y to continue. The package will now be downloaded and installed – you may also be asked whether to install packages for your specific locality/region.
Finally, you’ll be asked for a username and password specific to your Ubuntu installation. These don’t need to be the same as your Windows 10 credentials. With this step complete, you’ll find yourself at the Ubuntu bash command line.
Ubuntu Installation Congratulations! You have successfully installed and activated the Ubuntu terminal on Windows 10. You now have all the power of the command line at your fingertips.
Also Read- How To Change Hostname In Ubuntu 18.04 Without Restart.
That’s all, In this article, we have explained How to Install Ubuntu on Windows 10. I hope you enjoy this article. If you like this article, then just share it. If you have any questions about this article, please comment.

Here,appeaers a msg that ‘bash’ is not recognized as an internal or external command,
operable program or batch file.